Written 11/20/25
I am not a mechanic, and this is not a tutorial. I'm just sharing what I did. This is not a particularly dangerous project, but do your research and proceed at your own risk.
This is a project I did over a year ago, but now that I have a place to share such things I'm writing it up.
One of my family's cars is a 2012 Toyota Prius V, and it's everything we could possibly need out of a car. Plenty of space but not excessively big, great fuel economy, super reliable. But as with probably any car, there are a few things we don't like. One of those things is the single USB port, that only outputs 500mA, and causes the sound system to play Elvis Costello's Accidents Will Happen every time my dad plugs his phone in. With my brother's phone, it's Free Bird.
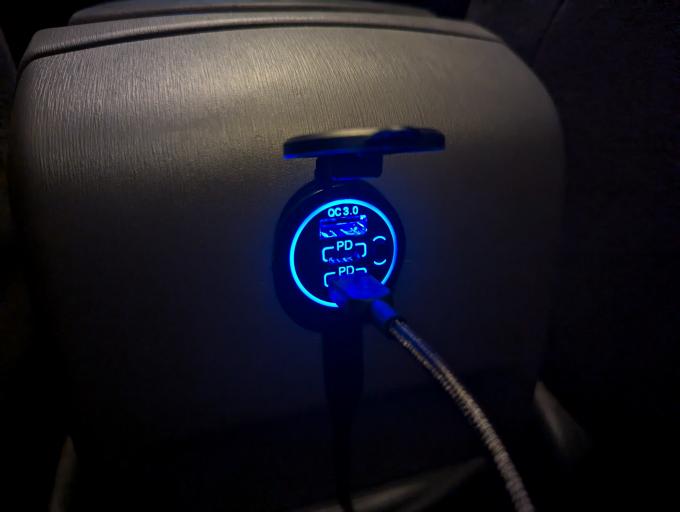
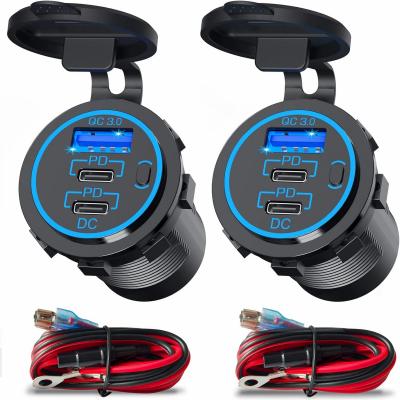
Since we've all heard Oh, I just-- many more times than we wanted to, and the charger can barely keep up with the power the phone uses, I decided to install some new chargers. A search online for car usbc outlet brought me to these. They feature two USB-C ports capable of 30w power delivery each, and a single USB-A port capable of 18w. They work on 12v, come with wires, are easily mountable, and are only about $12 each. So I bought a pair.
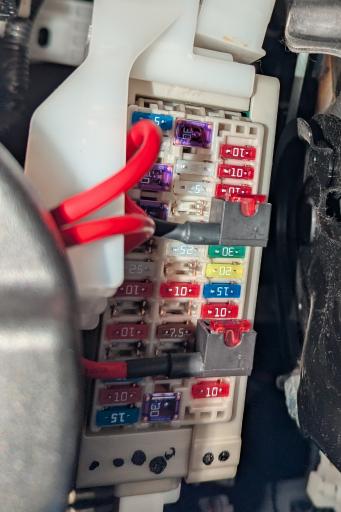
I needed a way to get power from the battery, and some more research led me to a fuse tap. It plugs in to the fuse box in place of a fuse. Then you install the fuse you removed into the tap, and that circuit continues working like normal. But the tap includes a second fuse, and a wire coming off of it. I identified the size of fuse the Prius uses and bought a few taps in that size.
Important safety note: Some of the fuses in this box power critical functions of the car, such as ABS. I don't recommend messing with those fuses. I used an empty port. If there weren't any, I would have tapped into a non-essential circuit, like the radio or heated seats. Also, running wires without installing a fuse is just a bad idea.
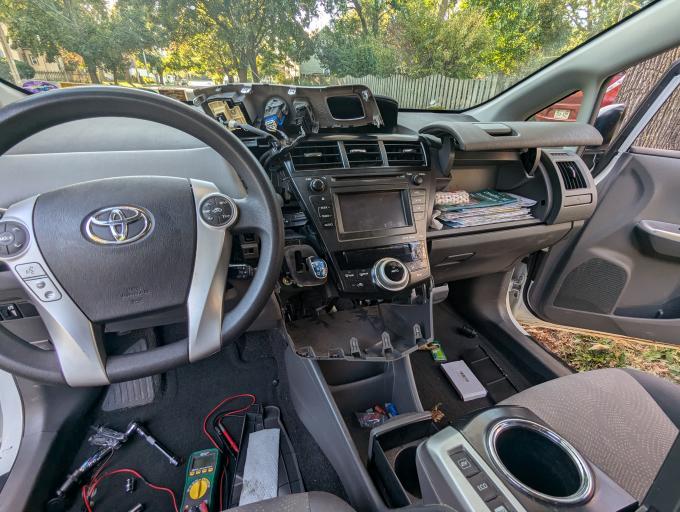
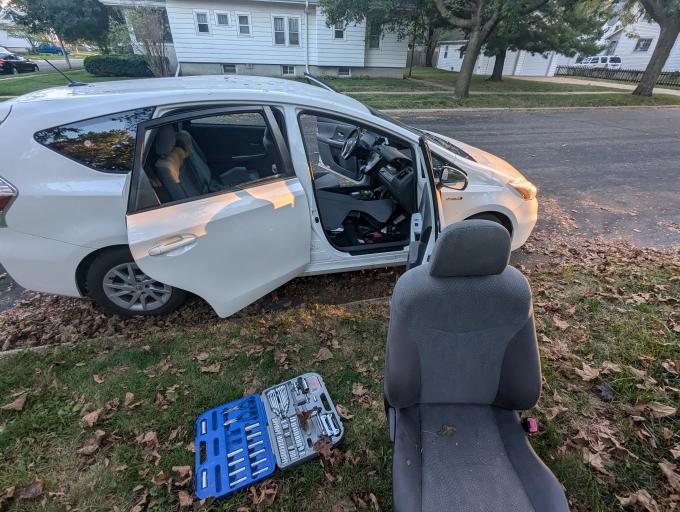
Then it was time to install them. I referenced some YouTube tutorials, but pretty much just started pulling apart the dashboard. I removed screws and pried at seams as I found them, and eventually got the lower part of the dashboard removed.
I removed the blank cover where the switch for the heated seats would be if our car had that option, and enlarged the hole with whatever tools were on hand. It's not perfect, but we're happy with whatever works, and we plan to drive that car until it don't run no more.
Then I had to run the wires. Conveniently, the car body is connected to the negative terminal of the battery, so the black wire simply has to run to a screw that touches non-painted metal. This is why the fuse tap only has one wire, which the red wire from the charger has to connect to. I cut off the connector that came on the charger's included wire and soldered it to the wire from the fuse tap,then plugged the fuse tap into an empty port. It's important to use a port that is only powered when the car is on, to prevent battery drain while the car is sitting. The one I used would power the heated seats or something in a higher trim level. There is a cover for the fuse box, but the tap wouldn't fit under it so I left it off. The fuses are held in there firmly and I don't think any will ever fall out.
Starting the car for a quick test proved it worked! Onto the second outlet.
I also wanted to install a charger in the back seat, and decided to put it in the back of the center console, centered above the cup holders. So first, I ran a wire back there, which proved to be rather tricky. I had to run a wire underneath the center console, so first I tried to remove the console. Annoyingly, there are three buttons in it, and a cable running to them, and no easy way to unplug it. Toyota, did you really think nobody would need to remove the console? So I ended up removing the passenger seat and setting the console on its side where the seat was.
At this point, my parents were growing slightly concerned. I had taken their car apart, the sun was going down, and we needed that car first thing the next morning.
Once the console was out it was pretty easy to run the positive wire, though I did have to extend it, and there was a convenient screw right there for the negative wire. I got the wire run, left the back part off of the console, and put the car back together.
Another important safety note: The fuse box in this car is located below the steering wheel, on the left side, meaning the wires had to cross above the pedals. I made sure they were secured above trim and with a LOT of zip ties. I don't want anything falling down in front of the brake.
The next day, with more time and light, I drilled a hole in the back of the console and mounted the charger. I don't remember exactly, but I think I had to bend the pins on the back of the socket outwards to make it fit. Apart from that, everything fit really well.
And just like that, I was done. I got a set of cables for the car: C to C, C to Lightning, and A to Micro, one set for the front and one for the back. I told my family that these cables are not allowed to leave the car, and that rule has actually worked. Apart from the one time I broke it, but we don't talk about that.
These chargers are amazing. I can run my Steam Deck from them and charge a phone fully in a couple hours. They also look really nice. The blue light isn't too bright and blends in with the rest of the dash really well. One thing to note is these won't work with most laptops. I had been looking at a 65w version, but it only had one USB-C port. I don't need to charge my laptop in the car.
This has been one of my most rewarding and useful projects ever. This is what DIY projects are all about: if it doesn't work how you want it to, you make it work how you want it to.